ShopDreamUp AI ArtDreamUp
Deviation Actions


Description
A few of you asked me wether or not I will publish/sell any of my patterns - the answer is YES! This is the first pattern I´m publishing, since it´s fairly easy and suitable for beginners.
This one will be free for all, and I guess I´ll publish a few more free - several other will be available on my etsy (along with tutorials, photos and tipps for beginners and skilled alike (Smile)") )
)
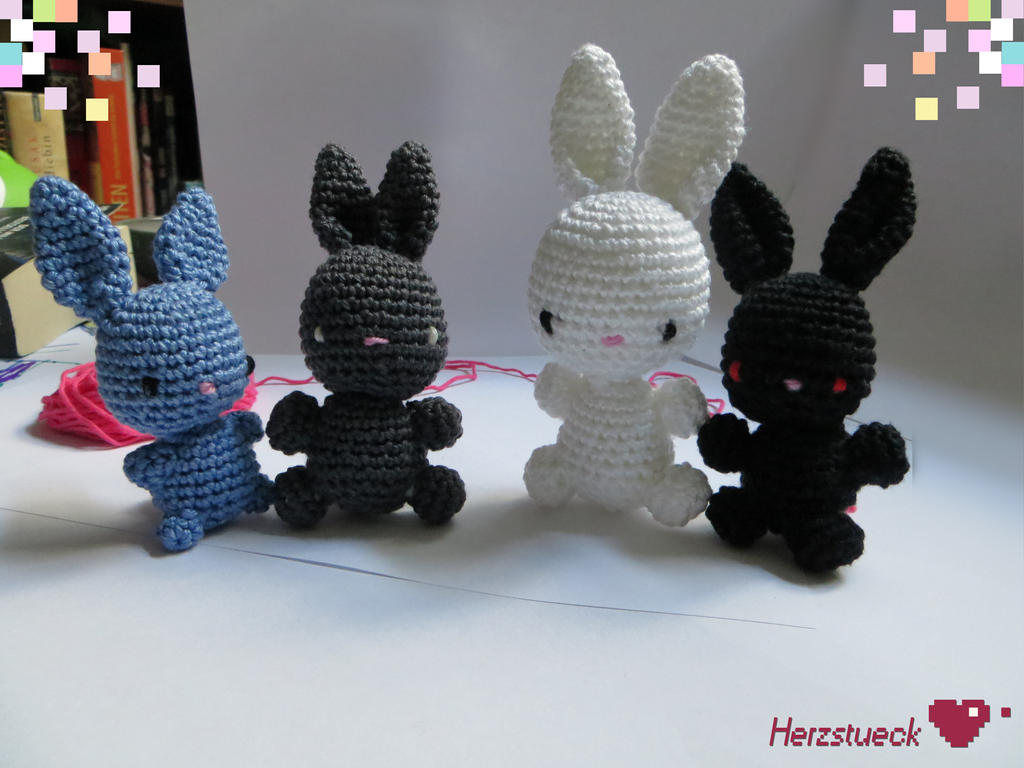
As you can seein the photo, this is a basic pattern, suited for slight changes to achieve little differences easily, such as longer ears or smaller bodies and legs.
Since I am trying to make a living of this, I ask you to please not sell the pattern or the finished bunnies; I´ve put lots of love but also time and work into these, and I can only continue with your support. I hope you all understand, and I thank you for it.
Well then - enough of the blabla - Lets get to the fun part - here´s my very first pattern - I hope you like it, and I´d love to see photos of your bunnies !
This pattern requires the following skills:
Single crochet (sc)
Single crochet increase (sc inc)
Single crochet decrease (sc dec)
Magic ring
Chain
slip stitch
and some sewing skills (Wink)")
The terms in brackets will be used in the pattern, the numbers in brackets describe the number of sc you will have in a round.
you can use pretty much any yarn - please follow the instructions for needle size, etc displayed on the yarn you purchase to achieve the best possible results.
Head:
round 1: crochet 6 chains in a magic ring (6)
round 2: sc inc in each sc (12)
round 3: sc inc in every second sc (18)
round 4: sc inc in every third sc (24)
round 5: sc in each sc around (24)
round 6: sc in each sc around (24)
round 7: sc in each sc around (24)
round 8: sc in each sc around (24)
round 9: sc inc in every fourth sc (30)
round 10: sc in each sc around (30)
round 11: sc dec at every fourth sc (24)
round 12: sc dec at every third sc (18)
round 13: sc dec at every second sc (12)
stuff head firmly to achieve anice shape
roud 14: sc dec at each sc (6)
fasten off with slip stitch andleave a long tail for sewing
Body:
round 1: crochet 6 chains in a magic ring (6)
round 2: sc inc in each sc (12)
round 3: sc inc in every second sc (18)
round 4: sc in each sc around (18)
round 5: sc in each sc around (18)
round 6: sc in each sc around (18)
round 7: sc in each sc around (18)
round 8: sc inc in every third sc (24)
round 9: sc in each sc around (24)
round 10: sc dec at every third sc (18)
round 11: sc dec at every second sc (12)
Stuff firmly to achieve a nice shape
round 12: sc dec at each sc around (6)
fasten off with slip stitch andleave a long tail for sewing
ears - make two:
round 1: crochet 4 chains into a magic ring (4)
round 2: sc inc at every second sc (6)
round 3:sc in each sc around (6)
round 4: sc inc in every third sc (8)
round 5: sc in each sc around (8)
round 6: sc inc in every fourth sc (10)
round 7: sc inc in everx firth sc (12)
round 8: sc in each sc around (12)
round 9: sc in each sc around (12)
round 10: sc in each sc around (12)
round 11: sc in each sc around (12)
fasten off with slip stitch, leave a long tail for sewing
paws - make four:
round 1: crochet 6 chains in a magic ring (6)
round 2: sc inc in each sc (12)
round 3: sc in each sc around(12)
stuff firmly, to achieve a nice shape
round 4: sc dec in each sc around(6)
fasten off with slip stitch, leave a long tail for sewing
Tail:
round 1: crochet 6 chains in a magic ring (6)
round 2: sc inc in each sc (12)
round 3: sc inc in every second sc (18)
round 4: sc dec in every second sc (12)
stuff firmly, to achieve a nice shape
round 5: sc dec in each sc around (6)
fasten off with slip stitch, leave a long tail for sewing
Sew the pieces together tightly, so they won´t fall of and make a nice shape.
For the eyes I simply use cotton yarn and stitch them vertically into the lower half of the face, a good 6 or seven sc apart - the nose is stitched in the middle, about the same height as the eyes, but horizontal instead of vertical.
Slight changes to the shape of the bunny can be easily achieved by simply changing the number of sc in a round or the number of rounds itself.
I hope very much that this pattern was useful to you, and you now have finished little amigurumi bunny
This one will be free for all, and I guess I´ll publish a few more free - several other will be available on my etsy (along with tutorials, photos and tipps for beginners and skilled alike
As you can seein the photo, this is a basic pattern, suited for slight changes to achieve little differences easily, such as longer ears or smaller bodies and legs.
Since I am trying to make a living of this, I ask you to please not sell the pattern or the finished bunnies; I´ve put lots of love but also time and work into these, and I can only continue with your support. I hope you all understand, and I thank you for it.
Well then - enough of the blabla - Lets get to the fun part - here´s my very first pattern - I hope you like it, and I´d love to see photos of your bunnies
This pattern requires the following skills:
Single crochet (sc)
Single crochet increase (sc inc)
Single crochet decrease (sc dec)
Magic ring
Chain
slip stitch
and some sewing skills
The terms in brackets will be used in the pattern, the numbers in brackets describe the number of sc you will have in a round.
you can use pretty much any yarn - please follow the instructions for needle size, etc displayed on the yarn you purchase to achieve the best possible results.
Head:
round 1: crochet 6 chains in a magic ring (6)
round 2: sc inc in each sc (12)
round 3: sc inc in every second sc (18)
round 4: sc inc in every third sc (24)
round 5: sc in each sc around (24)
round 6: sc in each sc around (24)
round 7: sc in each sc around (24)
round 8: sc in each sc around (24)
round 9: sc inc in every fourth sc (30)
round 10: sc in each sc around (30)
round 11: sc dec at every fourth sc (24)
round 12: sc dec at every third sc (18)
round 13: sc dec at every second sc (12)
stuff head firmly to achieve anice shape
roud 14: sc dec at each sc (6)
fasten off with slip stitch andleave a long tail for sewing
Body:
round 1: crochet 6 chains in a magic ring (6)
round 2: sc inc in each sc (12)
round 3: sc inc in every second sc (18)
round 4: sc in each sc around (18)
round 5: sc in each sc around (18)
round 6: sc in each sc around (18)
round 7: sc in each sc around (18)
round 8: sc inc in every third sc (24)
round 9: sc in each sc around (24)
round 10: sc dec at every third sc (18)
round 11: sc dec at every second sc (12)
Stuff firmly to achieve a nice shape
round 12: sc dec at each sc around (6)
fasten off with slip stitch andleave a long tail for sewing
ears - make two:
round 1: crochet 4 chains into a magic ring (4)
round 2: sc inc at every second sc (6)
round 3:sc in each sc around (6)
round 4: sc inc in every third sc (8)
round 5: sc in each sc around (8)
round 6: sc inc in every fourth sc (10)
round 7: sc inc in everx firth sc (12)
round 8: sc in each sc around (12)
round 9: sc in each sc around (12)
round 10: sc in each sc around (12)
round 11: sc in each sc around (12)
fasten off with slip stitch, leave a long tail for sewing
paws - make four:
round 1: crochet 6 chains in a magic ring (6)
round 2: sc inc in each sc (12)
round 3: sc in each sc around(12)
stuff firmly, to achieve a nice shape
round 4: sc dec in each sc around(6)
fasten off with slip stitch, leave a long tail for sewing
Tail:
round 1: crochet 6 chains in a magic ring (6)
round 2: sc inc in each sc (12)
round 3: sc inc in every second sc (18)
round 4: sc dec in every second sc (12)
stuff firmly, to achieve a nice shape
round 5: sc dec in each sc around (6)
fasten off with slip stitch, leave a long tail for sewing
Sew the pieces together tightly, so they won´t fall of and make a nice shape.
For the eyes I simply use cotton yarn and stitch them vertically into the lower half of the face, a good 6 or seven sc apart - the nose is stitched in the middle, about the same height as the eyes, but horizontal instead of vertical.
Slight changes to the shape of the bunny can be easily achieved by simply changing the number of sc in a round or the number of rounds itself.
I hope very much that this pattern was useful to you, and you now have finished little amigurumi bunny
Image size
4000x3000px 1.85 MB
Make
Canon
Model
Canon PowerShot SX240 HS
Shutter Speed
1/20 second
Aperture
F/3.5
Focal Length
5 mm
ISO Speed
800
Date Taken
Sep 21, 2014, 1:55:23 PM
Sensor Size
6mm
© 2014 - 2024 Herzstueck-Handmade
Comments4
Join the community to add your comment. Already a deviant? Log In
OMGosh, these are so adorable! 
